学习腾讯大佬讲解go语言项目开发实战, 有些关于go项目开发的,非专栏内容也会写在这篇文章里
课程地址:https://time.geekbang.org/column/intro/100079601
01IAM系统概述
这篇主要将 一个iam系统的架构 ,先了解项目架构,不然后面学技术都不知道为啥干啥还是不太好,虽然这篇文章没啥技术点可言,学习下他干项目的思路吧,为啥这么架构。

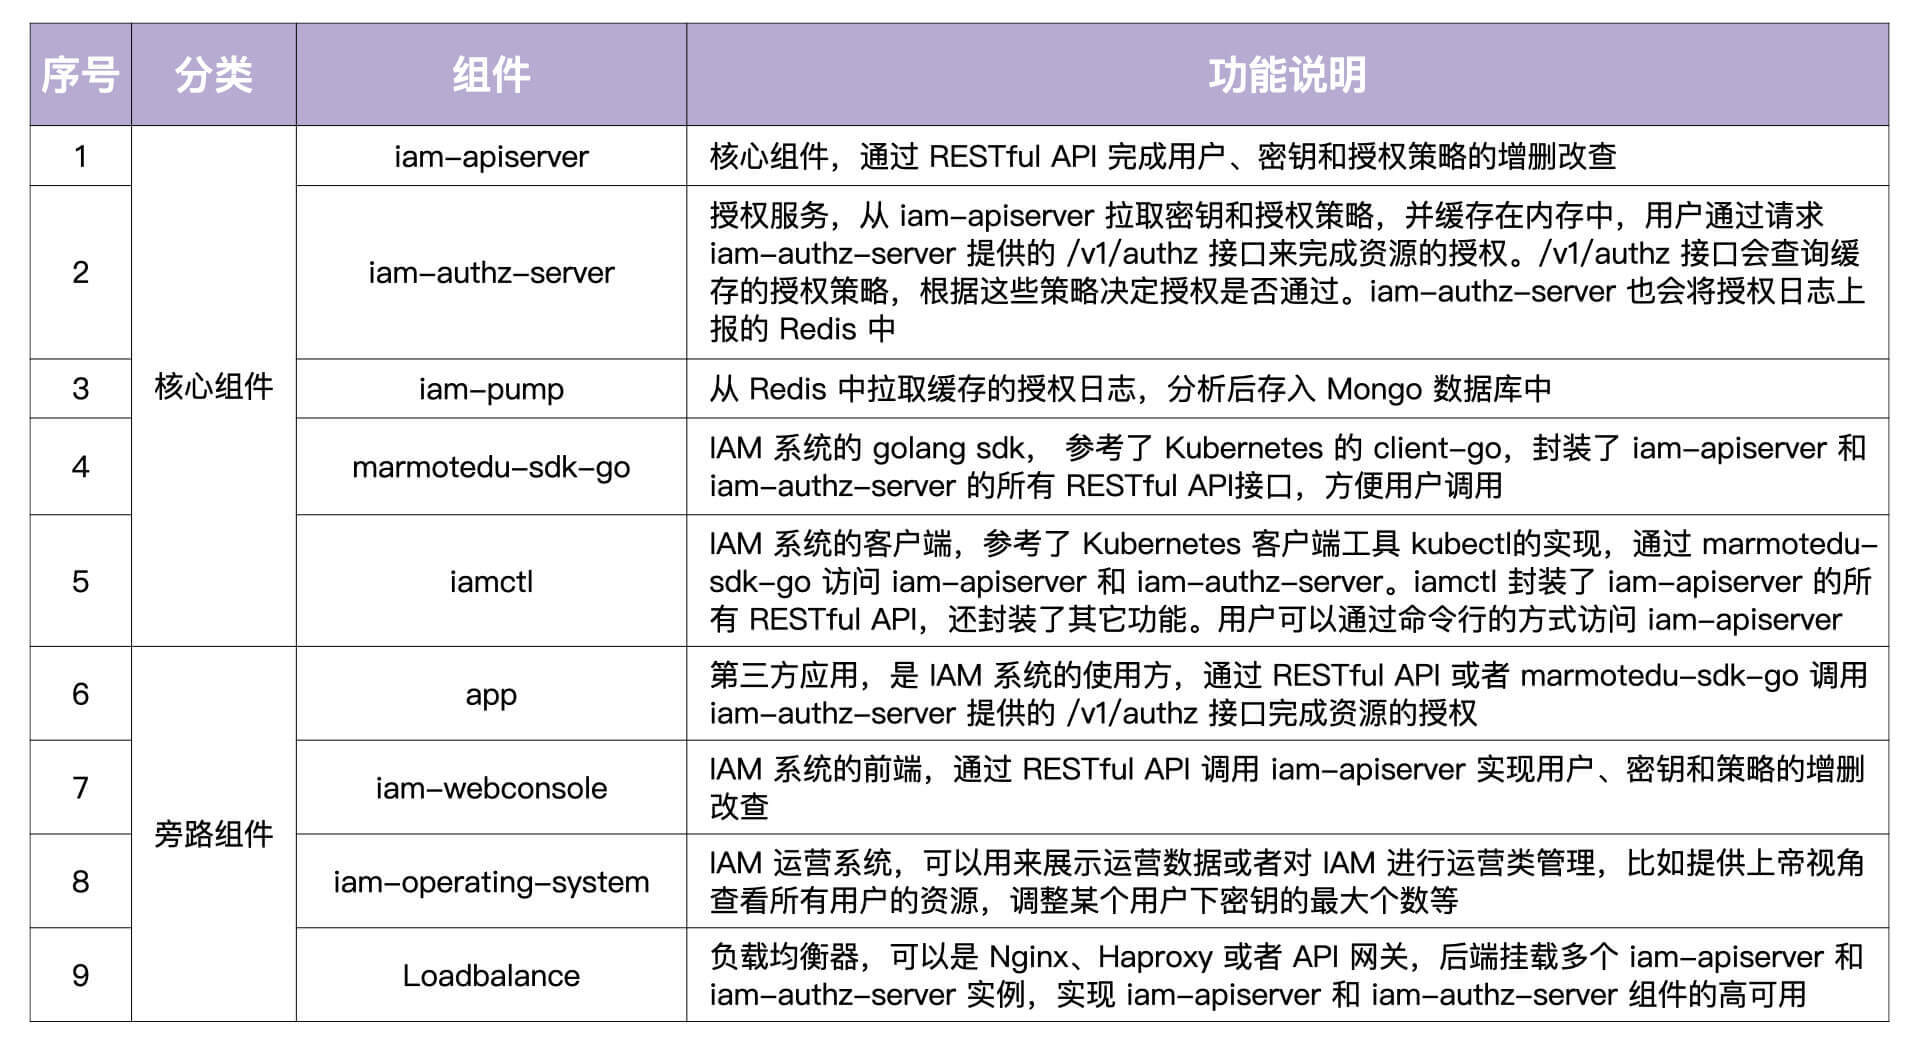
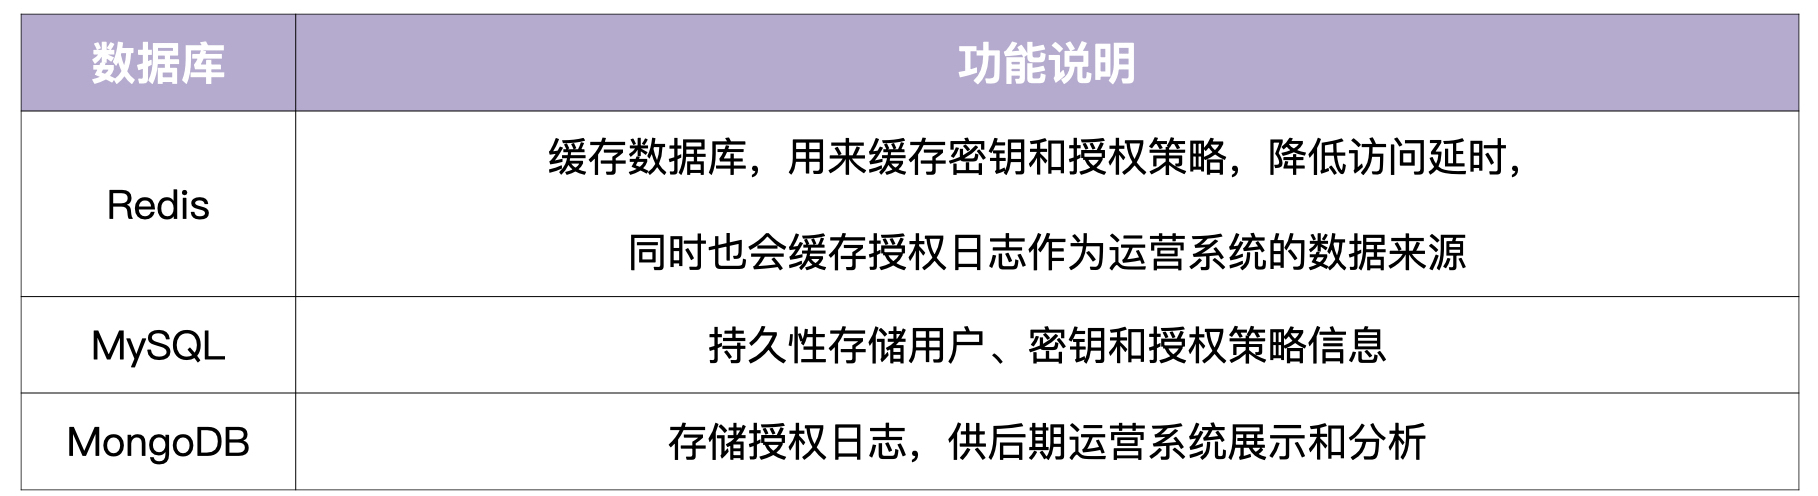
- 用户通过 iam-webconsole(RESTful API)或 iamctl(sdk marmotedu-sdk-go)客户端请求 iam-apiserver 提供的 RESTful API 接口完成用户、密钥、授权策略的增删改查,iam-apiserver 会将这些资源数据持久化存储在 MySQL 数据库中. 通信安全考虑,这里都用https方式来访问
- 用户可以通过请求 iam-authz-server 提供的 /v1/authz 接口进行资源授权。 iam-authz-server 通过调用 iam-apiserver 提供的 gRPC 接口,将密钥和授权策略信息缓存到内存中。 采用redis 的发布订阅模式,保证 缓存信息 和 iam-apiserver中的数据一致
- 授权日志数据分析。 iam-authz-server 会将授权日志上报到 Redis 高速缓存中。 一个组件会去消费获得到数据,并清理数据,存到mongodb中,,供运营系统 iam-operating-system 查询
- 运营平台授权数据展示。 iam-operating-system 是 IAM 的运营系统,它可以通过查询 MongoDB 获取并展示运营数据
然后讲了 前后端分离架构 和 mvc 架构的特点,和使用场景。 这个自己看着办吧。 只有合适的架构。 需要根据公司情况而定。
02环境安装
作为多年的程序员,环境还是没啥大问题,有几个自己不太懂的技能点做个笔记即可。
使用普通用户来操作linux ,将普通用户添加到 sudoer 中即可
1sed -i '/^root.*ALL=(ALL).*ALL/a\going\tALL=(ALL) \tALL' /etc/sudoers
这个就是在root xxx 后面追加一行,可以完全vim 这个文件 加上,我是ubuntu系统加上下面即可 可能和文章的centos8.2有点不一样而已。
1going ALL=(ALL:ALL) ALL
protoc,protoc-gen-go 安装 以前早就装过,之前公司开发的社交项目就是用grpc做服务的。
至于开发工具选择,选择自己喜欢的就行,他用spacevim ,我还是选择我的goland 。 毕竟要钱的一般都比不要的好 。😄
03项目部署
根据安装稳定,选择ubuntu系列,稍微改改安装即可,作为多年老程序员没啥问题。
顺利安装成功。 我把所有密码改成了123456 ,方便自己输入。 这个项目还是打算好好研究源码的要。
程序目录说明
一些我的目录说明,以防忘记了
- 项目目录 /home/www/workspace/golang/src/github.com/marmotedu/iam
- /home/vagrant/bin/iamctl 命令行
- /etc/iam/iam-apiserver.yaml
- /etc/iam/iam-authz-server.yaml
- /etc/iam/iam-pump.yaml
1vagrant@ubuntu2204:/etc/iam/cert$ ls
2ca-config.json  ca-key.pem             iam-apiserver.pem
3ca.csr          ca.pem                 iam-authz-server-key.pem
4ca-csr.json     iam-apiserver-key.pem  iam-authz-server.pem
5
6vagrant@ubuntu2204:/opt/iam/bin$ ls
7iam-apiserver  iam-authz-server  iam-pump
1vagrant@ubuntu2204:/home/www/workspace/golang/src/github.com/marmotedu/iam$ ps -ef | grep iam
2root       26827       1  0 15:21 ?        00:00:02 /opt/iam/bin/iam-apiserver --config=/etc/iam/iam-apiserver.yaml
3root       28020       1  0 15:45 ?        00:00:03 /opt/iam/bin/iam-authz-server --config=/etc/iam/iam-authz-server.yaml
4root       28955       1  1 16:00 ?        00:00:00 /opt/iam/bin/iam-pump --config=/etc/iam/iam-pump.yaml
5
6vagrant@ubuntu2204:/etc/systemd/system$ ls -al | grep iam
7-rw-r--r--  1 vagrant vagrant  419 Apr 25 15:20 iam-apiserver.service
8-rw-r--r--  1 vagrant vagrant  433 Apr 25 15:45 iam-authz-server.service
9-rw-r--r--  1 vagrant vagrant  401 Apr 25 16:00 iam-pump.service
system service 编写
/etc/systemd/system/iam-apiserver.service
 1[Unit]
 2Description=IAM APIServer
 3Documentation=https://github.com/marmotedu/iam/blob/master/init/README.md
 4
 5[Service]
 6WorkingDirectory=/data/iam/iam-apiserver
 7ExecStartPre=/usr/bin/mkdir -p /data/iam/iam-apiserver
 8ExecStartPre=/usr/bin/mkdir -p /var/log/iam
 9ExecStart=/opt/iam/bin/iam-apiserver --config=/etc/iam/iam-apiserver.yaml
10Restart=always
11RestartSec=5
12StartLimitInterval=0
13
14[Install]
15WantedBy=multi-user.target
1sudo systemctl daemon-reload
2sudo systemctl enable iam-apiserver
3sudo systemctl restart iam-apiserver
4man iam-apiserver
5iamctl version -o yaml
04项目规范设计(上)
代码规定、目录规范、接口规范、错误码规范
- 非编码类规范,主要包括开源规范、文档规范、版本规范、Commit 规范和发布规范。
- 编码类规范,则主要包括目录规范、代码规范、接口规范、日志规范和错误码规范。
开源协议
开源规范,开源协议大致了解下
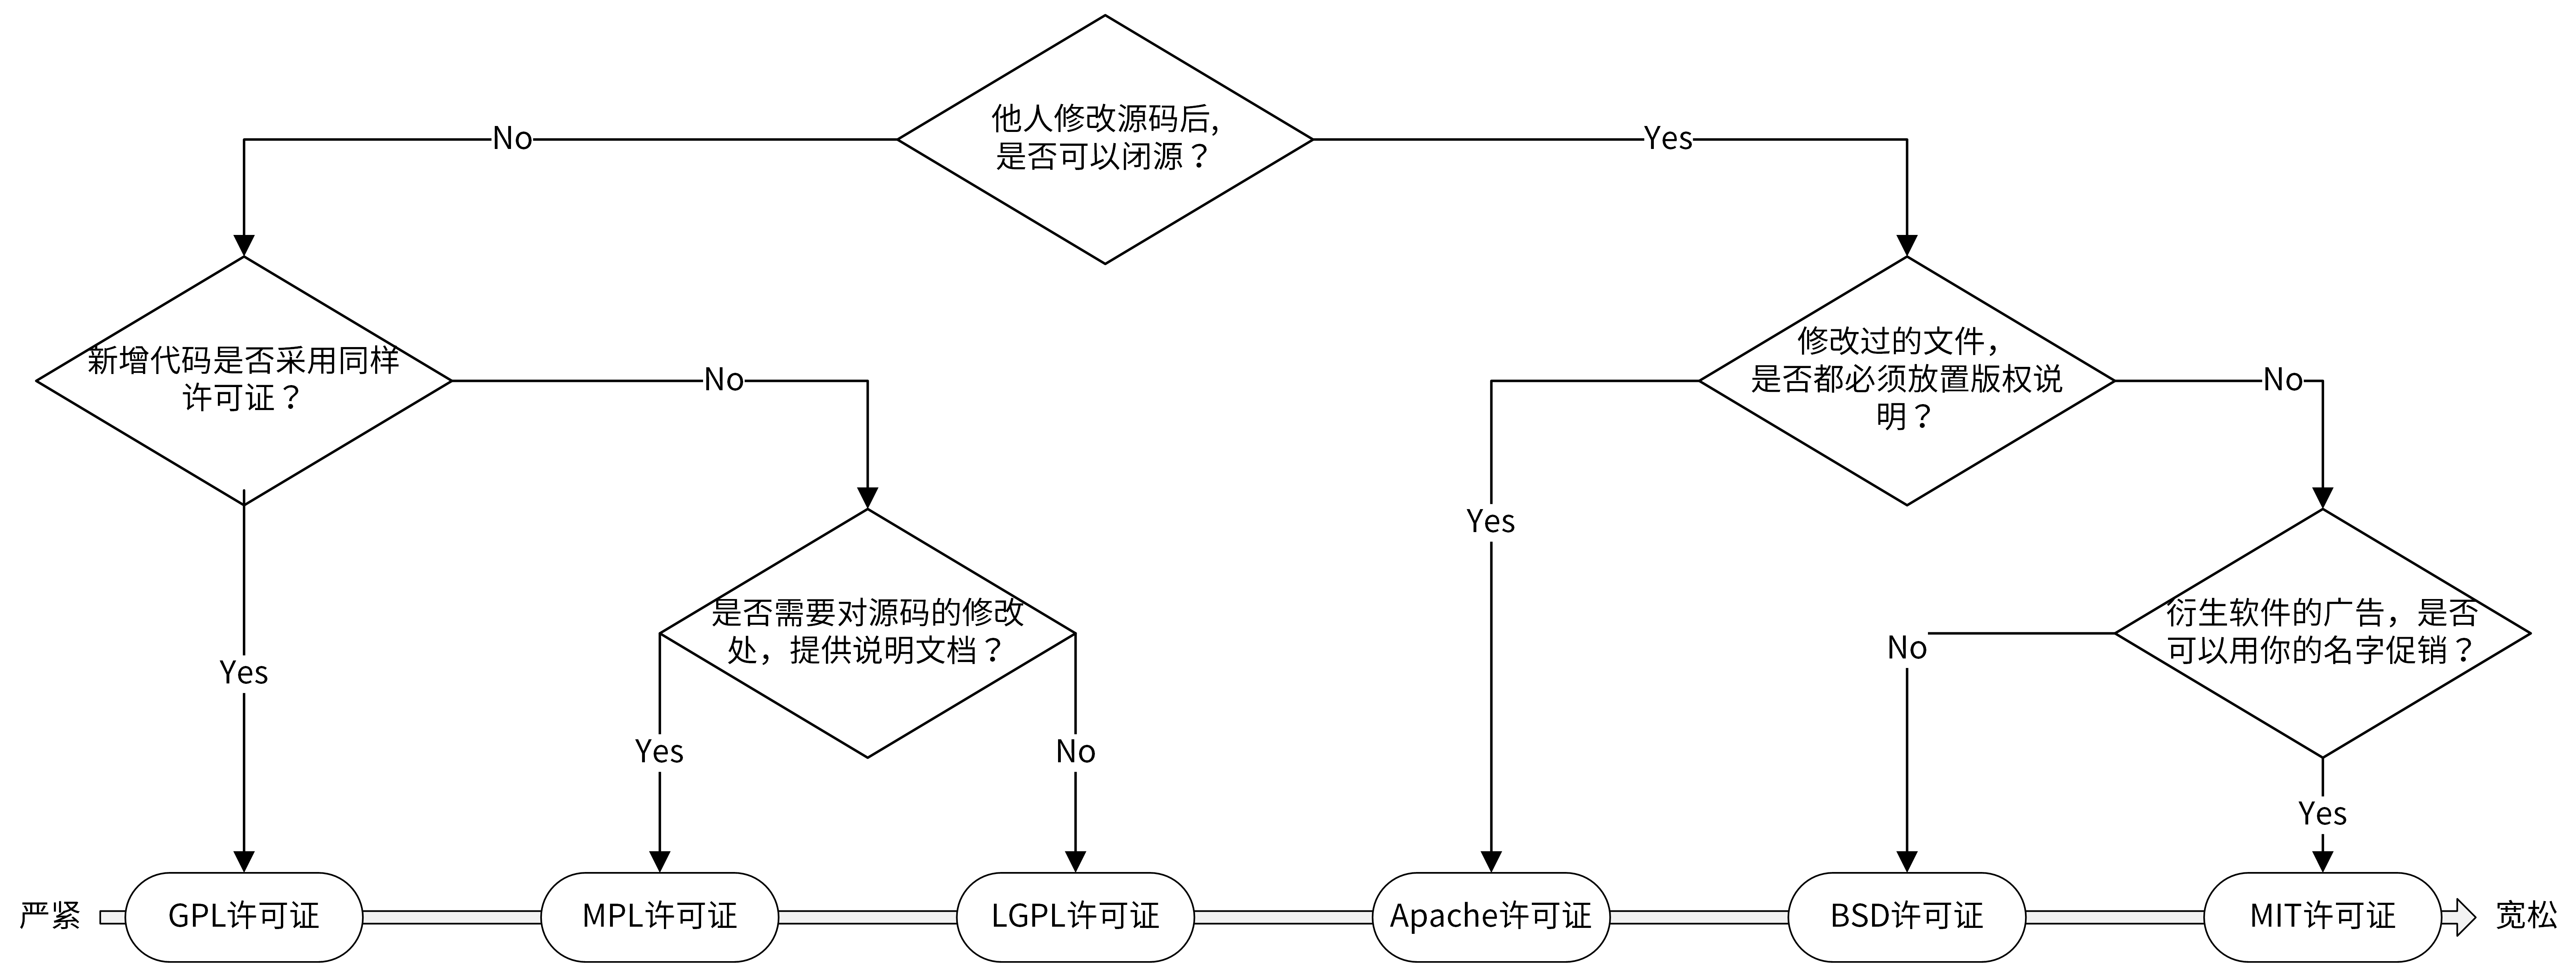
大型公司的开源项目通常会采用 Apache 2.0 开源协议,使用者也可以在需要的时候修改代码来满足需要
一般自己的项目采用mtg协议即可
文档规范
readme模板
 1# 项目名称
 2
 3<!-- 写一段简短的话描述项目 -->
 4
 5## 功能特性
 6
 7<!-- 描述该项目的核心功能点 -->
 8
 9## 软件架构(可选)
10
11<!-- 可以描述下项目的架构 -->
12
13## 快速开始
14
15### 依赖检查
16
17<!-- 描述该项目的依赖,比如依赖的包、工具或者其他任何依赖项 -->
18
19### 构建
20
21<!-- 描述如何构建该项目 -->
22
23### 运行
24
25<!-- 描述如何运行该项目 -->
26
27## 使用指南
28
29<!-- 描述如何使用该项目 -->
30
31## 如何贡献
32
33<!-- 告诉其他开发者如果给该项目贡献源码 -->
34
35## 社区(可选)
36
37<!-- 如果有需要可以介绍一些社区相关的内容 -->
38
39## 关于作者
40
41<!-- 这里写上项目作者 -->
42
43## 谁在用(可选)
44
45<!-- 可以列出使用本项目的其他有影响力的项目,算是给项目打个广告吧 -->
46
47## 许可证
48
49<!-- 这里链接上该项目的开源许可证 -->
 1docs
 2├── devel                            # 开发文档,可以提前规划好,英文版文档和中文版文档
 3│   ├── en-US/                       # 英文版文档,可以根据需要组织文件结构
 4│   └── zh-CN                        # 中文版文档,可以根据需要组织文件结构
 5│       └── development.md           # 开发手册,可以说明如何编译、构建、运行项目
 6├── guide                            # 用户文档
 7│   ├── en-US/                       # 英文版文档,可以根据需要组织文件结构
 8│   └── zh-CN                        # 中文版文档,可以根据需要组织文件结构
 9│       ├── api/                     # API文档
10│       ├── best-practice            # 最佳实践,存放一些比较重要的实践文章
11│       │   └── authorization.md
12│       ├── faq                      # 常见问题
13│       │   ├── iam-apiserver
14│       │   └── installation
15│       ├── installation             # 安装文档
16│       │   └── installation.md
17│       ├── introduction/            # 产品介绍文档
18│       ├── operation-guide          # 操作指南,里面可以根据RESTful资源再划分为更细的子目录,用来存放系统核心/全部功能的操作手册
19│       │   ├── policy.md
20│       │   ├── secret.md
21│       │   └── user.md
22│       ├── quickstart               # 快速入门
23│       │   └── quickstart.md
24│       ├── README.md                # 用户文档入口文件
25│       └── sdk                      # SDK文档
26│           └── golang.md
27└── images                           # 图片存放目录
28    └── 部署架构v1.png
接口文档
接口文档有四种编写方式,包括编写 Word 格式文档、借助工具编写、通过注释生成和编写(swagger)、 Markdown 格式文档。
版本规范
项目中的组件也建议加上版本。
主版本号.次版本号.修订号(X.Y.Z)
建议 0.1.0 作为第一个开发版本号
05项目规范下(下) commit规范
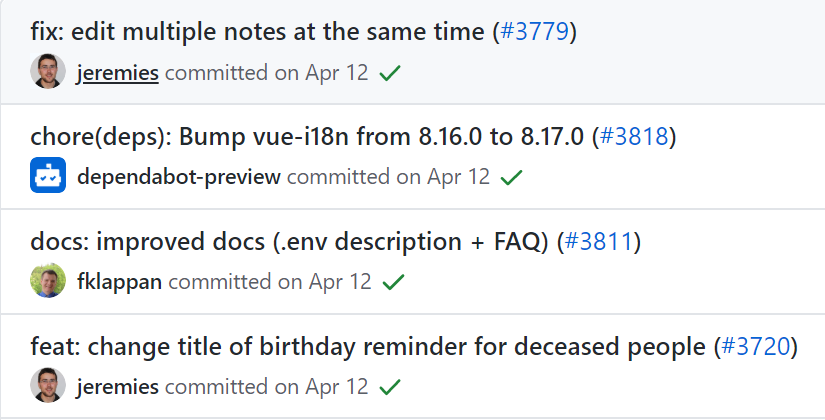
在 Angular 规范中,Commit Message 包含三个部分,分别是 Header、Body 和 Footer,格式如下:
1<type>[optional scope]: <description>
2// 空行
3[optional body]
4// 空行
5[optional footer(s)]
如
1fix(core): remove xxxx
2
3this api is xxxx
4
5PR close #xxx
commit type 类型
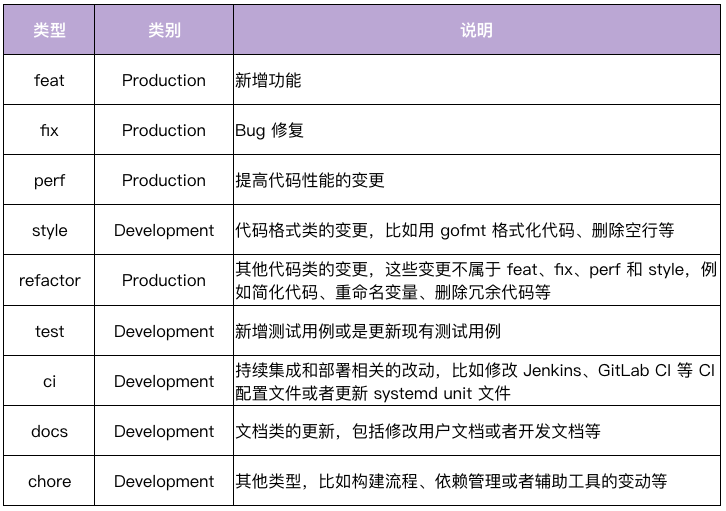
Header中 第二个字段 scope 表示影响范围
Body 它是对本次 commit 的更详细描述,是可选的
Footer 主要用来说明本次 commit 导致的后果
commit 时机
比如修复完一个 bug、开发完一个小功能,或者开发完一个完整的功能,测试通过后就提交
合并提交
git rebase -i commit-id
修改 Commit Message
2种方式
-
git commit –amend:修改最近一次 commit 的 message;
-
git rebase -i:修改某次 commit 的 message。
Commit Message 规范自动化
这个没用过。 先放放,目前没有使用场景。
06目录结构设计
https://github.com/golang-standards/project-layout
 1├── api
 2│   ├── openapi
 3│   └── swagger
 4├── build
 5│   ├── ci
 6│   ├── docker
 7│   │   ├── iam-apiserver
 8│   │   ├── iam-authz-server
 9│   │   └── iam-pump
10│   ├── package
11├── CHANGELOG
12├── cmd
13│   ├── iam-apiserver
14│   │   └── apiserver.go
15│   ├── iam-authz-server
16│   │   └── authzserver.go
17│   ├── iamctl
18│   │   └── iamctl.go
19│   └── iam-pump
20│       └── pump.go
21├── configs
22├── CONTRIBUTING.md
23├── deployments
24├── docs
25│   ├── devel
26│   │   ├── en-US
27│   │   └── zh-CN
28│   ├── guide
29│   │   ├── en-US
30│   │   └── zh-CN
31│   ├── images
32│   └── README.md
33├── examples
34├── githooks
35├── go.mod
36├── go.sum
37├── init
38├── internal
39│   ├── apiserver
40│   │   ├── api
41│   │   │   └── v1
42│   │   │       └── user
43│   │   ├── apiserver.go
44│   │   ├── options
45│   │   ├── service
46│   │   ├── store
47│   │   │   ├── mysql
48│   │   │   ├── fake
49│   │   └── testing
50│   ├── authzserver
51│   │   ├── api
52│   │   │   └── v1
53│   │   │       └── authorize
54│   │   ├── options
55│   │   ├── store
56│   │   └── testing
57│   ├── iamctl
58│   │   ├── cmd
59│   │   │   ├── completion
60│   │   │   ├── user
61│   │   └── util
62│   ├── pkg
63│   │   ├── code
64│   │   ├── options
65│   │   ├── server
66│   │   ├── util
67│   │   └── validation
68├── LICENSE
69├── Makefile
70├── _output
71│   ├── platforms
72│   │   └── linux
73│   │       └── amd64
74├── pkg
75│   ├── util
76│   │   └── genutil
77├── README.md
78├── scripts
79│   ├── lib
80│   ├── make-rules
81├── test
82│   ├── testdata
83├── third_party
84│   └── forked
85└── tools
07-工作流设计:如何设计合理的多人开发模式?
git flow 工作流 , 各分支都有自己的用途,如开发分支,预发布分支,线上分支等。
功能分支工作流 : 只有master 分支和 开发分支, 开发分支最终都合并到master 上。
10 怎么写出优雅的Go项目?
好的文档 readme模版: https://readme.so/editor
makefile, 代码生成
对接CI/CD
代码规范
Effective Go :高效Go编程,由Golang官方编写,里面包含了编写Go代码的一些建议,也可以理解为最佳实践。
Go Code Review Comments :Golang官方编写的Go最佳实践,作为Effective Go的补充。
Style guideline for Go packages :包含了如何组织Go包、如何命名Go包、如何写Go包文档的一些建议。
Go语言的静态代码检查工具有很多,目前用的最多的是 golangci-lint
编写可测试的代码
代码可测试,可mock ,通过依赖注入的方式去编写代码。
常用的Mock工具,有这么几个:
golang/mock ,是官方提供的Mock框架。它实现了基于interface的Mock功能,能够与Golang内置的testing包做很好的集成,是最常用的Mock工具。golang/mock提供了mockgen工具用来生成interface对应的Mock源文件。
sqlmock ,可以用来模拟数据库连接。数据库是项目中比较常见的依赖,在遇到数据库依赖时都可以用它。
httpmock ,可以用来Mock HTTP请求。
bouk/monkey ,猴子补丁,能够通过替换函数指针的方式来修改任意函数的实现。如果golang/mock、sqlmock和httpmock这几种方法都不能满足我们的需求,我们可以尝试通过猴子补丁的方式来Mock依赖。可以这么说,猴子补丁提供了单元测试 Mock 依赖的最终解决方案。
单元测试覆盖率 :
1$ go test -race -cover  -coverprofile=./coverage.out -timeout=10m -short -v ./...
2$ go tool cover -func ./coverage.out
自动生成代码
- 错误码、错误码说明文档。
- 自动生成缺失的doc.go文件。
- 利用gotests工具,自动生成单元测试用例。
- 使用Swagger工具,自动生成Swagger文档。
- 使用Mock工具,自动生成接口的Mock实例。
11 Go常用设计模式
单例
 1package singleton
 2
 3import (
 4    "sync"
 5)
 6
 7type singleton struct {
 8}
 9
10var ins *singleton
11var once sync.Once
12
13func GetInsOr() *singleton {
14    once.Do(func() {
15        ins = &singleton{}
16    })
17    return ins
18}
在实际开发中,我建议返回非指针的实例,因为我们主要是想通过创建实例,调用其提供的方法,而不是对实例做更改。如果需要对实例做更改,可以实现SetXXX的方法。通过返回非指针的实例,可以确保实例的属性,避免属性被意外/任意修改。
简单工厂、抽象工厂
简单工厂
 1type Person struct {
 2  Name string
 3  Age int
 4}
 5
 6func (p Person) Greet() {
 7  fmt.Printf("Hi! My name is %s", p.Name)
 8}
 9
10func NewPerson(name string, age int) *Person {
11  return Person{
12    Name: name,
13    Age: age
14  }
15}
抽象工厂
返回的是接口
 1type Person interface {
 2  Greet()
 3}
 4
 5type person struct {
 6  name string
 7  age int
 8}
 9
10func (p person) Greet() {
11  fmt.Printf("Hi! My name is %s", p.name)
12}
13
14// Here, NewPerson returns an interface, and not the person struct itself
15func NewPerson(name string, age int) Person {
16  return person{
17    name: name,
18    age: age
19  }
20}
策略模式
 1package strategy
 2
 3// 策略模式
 4
 5// 定义一个策略类
 6type IStrategy interface {
 7   do(int, int) int
 8}
 9
10// 策略实现:加
11type add struct{}
12
13func (*add) do(a, b int) int {
14   return a + b
15}
16
17// 策略实现:减
18type reduce struct{}
19
20func (*reduce) do(a, b int) int {
21   return a - b
22}
23
24// 具体策略的执行者
25type Operator struct {
26   strategy IStrategy
27}
28
29// 设置策略
30func (operator *Operator) setStrategy(strategy IStrategy) {
31   operator.strategy = strategy
32}
33
34// 调用策略中的方法
35func (operator *Operator) calculate(a, b int) int {
36   return operator.strategy.do(a, b)
37}
测试:
 1func TestStrategy(t *testing.T) {
 2	operator := Operator{}
 3
 4	operator.setStrategy(&add{})
 5	result := operator.calculate(1, 2)
 6	fmt.Println("add:", result)
 7
 8	operator.setStrategy(&reduce{})
 9	result = operator.calculate(2, 1)
10	fmt.Println("reduce:", result)
11}
模版模式
 1package template
 2
 3import "fmt"
 4
 5type Cooker interface {
 6	fire()
 7	cooke()
 8	outfire()
 9}
10
11// 类似于一个抽象类
12type CookMenu struct {
13}
14
15func (CookMenu) fire() {
16	fmt.Println("开火")
17}
18
19// 做菜,交给具体的子类实现
20func (CookMenu) cooke() {
21}
22
23func (CookMenu) outfire() {
24	fmt.Println("关火")
25}
26
27// 封装具体步骤
28func doCook(cook Cooker) {
29	cook.fire()
30	cook.cooke()
31	cook.outfire()
32}
33
34type XiHongShi struct {
35	CookMenu
36}
37
38func (*XiHongShi) cooke() {
39	fmt.Println("做西红柿")
40}
41
42type ChaoJiDan struct {
43	CookMenu
44}
45
46func (ChaoJiDan) cooke() {
47	fmt.Println("做炒鸡蛋")
48}
测试:
 1func TestTemplate(t *testing.T) {
 2	// 做西红柿
 3	xihongshi := &XiHongShi{}
 4	doCook(xihongshi)
 5
 6	fmt.Println("\n=====> 做另外一道菜")
 7	// 做炒鸡蛋
 8	chaojidan := &ChaoJiDan{}
 9	doCook(chaojidan)
10
11}
选项模式
 1package options
 2
 3import (
 4	"time"
 5)
 6
 7type Connection struct {
 8	addr    string
 9	cache   bool
10	timeout time.Duration
11}
12
13const (
14	defaultTimeout = 10
15	defaultCaching = false
16)
17
18type options struct {
19	timeout time.Duration
20	caching bool
21}
22
23// Option overrides behavior of Connect.
24type Option interface {
25	apply(*options)
26}
27
28type optionFunc func(*options)
29
30func (f optionFunc) apply(o *options) {
31	f(o)
32}
33
34func WithTimeout(t time.Duration) Option {
35	return optionFunc(func(o *options) {
36		o.timeout = t
37	})
38}
39
40func WithCaching(cache bool) Option {
41	return optionFunc(func(o *options) {
42		o.caching = cache
43	})
44}
45
46// Connect creates a connection.
47func Connect(addr string, opts ...Option) (*Connection, error) {
48	options := options{
49		timeout: defaultTimeout,
50		caching: defaultCaching,
51	}
52
53	for _, o := range opts {
54		o.apply(&options)
55	}
56
57	return &Connection{
58		addr:    addr,
59		cache:   options.caching,
60		timeout: options.timeout,
61	}, nil
62}
12-API风格(上):如何设计RESTfulAPI
api 版本
API版本有不同的标识方法,在RESTful API开发中,通常将版本标识放在如下3个位置:
- URL中,比如/v1/users。
- HTTP Header中,比如Accept: vnd.example-com.foo+json; version=1.0。
- Form参数中,比如/users?version=v1。
API命名
API通常的命名方式有三种,分别是驼峰命名法(serverAddress)、蛇形命名法(server_address)和脊柱命名法(server-address)。
驼峰命名法和蛇形命名法都需要切换输入法,会增加操作的复杂性,也容易出错,所以这里建议用脊柱命名法。GitHub API用的就是脊柱命名法,例如 selected-actions
api 域名
API的域名设置主要有两种方式:
https://marmotedu.com/api ,这种方式适合API将来不会有进一步扩展的情况,比如刚开始marmotedu.com域名下只有一套API系统,未来也只有这一套API系统。
https://iam.api.marmotedu.com,如果marmotedu.com域名下未来会新增另一个系统API,这时候最好的方式是每个系统的API拥有专有的API域名,比如:storage.api.marmotedu.com,network.api.marmotedu.com。腾讯云的域名就是采用这种方式。
13-API风格(下):RPCAPI介绍
protoc optional
生成可以指针类型的,没用过,学习下。
 1syntax = "proto3";
 2
 3package proto;
 4option go_package = "github.com/marmotedu/gopractise-demo/protobuf/user";
 5
 6//go:generate protoc -I. --experimental_allow_proto3_optional --go_out=plugins=grpc:.
 7
 8service User {
 9  rpc GetUser(GetUserRequest) returns (GetUserResponse) {}
10}
11
12message GetUserRequest {
13  string class = 1;
14  optional string username = 2;
15  optional string user_id = 3;
16}
17
18message GetUserResponse {
19  string class = 1;
20  string user_id = 2;
21  string username = 3;
22  string address = 4;
23  string sex = 5;
24  string phone = 6;
25}
1protoc --experimental_allow_proto3_optional --go_out=plugins=grpc:. user.proto
1type GetUserRequest struct {
2    state         protoimpl.MessageState
3    sizeCache     protoimpl.SizeCache
4    unknownFields protoimpl.UnknownFields
5
6    Class    string  `protobuf:"bytes,1,opt,name=class,proto3" json:"class,omitempty"`
7    Username *string `protobuf:"bytes,2,opt,name=username,proto3,oneof" json:"username,omitempty"`
8    UserId   *string `protobuf:"bytes,3,opt,name=user_id,json=userId,proto3,oneof" json:"user_id,omitempty"`
9}
16-代码检查:如何进行静态代码检查
goland 开发工具会帮我做一定的代码提示。
go vet 工具
https://studygolang.com/articles/9619
 1package main
 2
 3import "sync"
 4
 5type B struct {
 6	m sync.Mutex
 7}
 8
 9func (b B) Lock() {
10	b.m.Lock()
11}
12
13func main() {
14	var a = B{
15		m: sync.Mutex{},
16	}
17	// 这个Lock 是会复制一份的,并不是初始化时候的锁
18	a.Lock()
19}
1go vet test1.go
2# command-line-arguments
3./test1.go:9:9: Lock passes lock by value: command-line-arguments.B contains sync.Mutex
golangci-lint
golangci-lint 聚合了几十种 go lint 工具,但默认情况仅开启如下几种:
- deadcode:查找代码中的未用代码;
- errcheck:检查代码中是否存在未处理的错误;
- gosimple:专注于发现可以进一步简化的代码的 lint 工具;
- govet:go 官方工具链中的 vet 工具;
- ineffassign:检查源码中是否存在无效赋值的情况 (赋值了,但没有使用);
- staticcheck:通用型 lint 工具,增强的 “go vet”,对代码进行很多 go vet 尚未进行的静态检查;
- structcheck:查找未使用的结构体字段;
- typecheck:像 go 编译器前端那样去解析 Go 代码并做类型检查;
- unused:检查源码中是否存在未使用的常量、变量、函数和类型;
- varcheck:检查源码中是否存在未使用的全局变量和常量;
1go install github.com/golangci/golangci-lint/cmd/golangci-lint@v1.50.1
2golangci-lint -h
3golangci-lint help linters
uber 推荐的配置
https://github.com/uber-go/guide/blob/master/.golangci.yml
 1run:
 2  timeout: 5m
 3  modules-download-mode: readonly
 4
 5linters:
 6  disable-all: true
 7  enable:
 8    - govet
 9
10
11linters-settings:
12  govet:
13    # Default: false
14    disable-all: true
15    # Enable analyzers by name (in addition to default).
16    # Run `go tool vet help` to see all analyzers.
17    # Default: []
18    # 这里只开启了 printf的静态检测。
19    enable:
20     - printf
21
22issues:
23  exclude-use-default: false
24  max-issues-per-linter: 0
25  max-same-issues: 0
老师给的配置,后续需要可要参考
 1run:
 2  skip-dirs: # 设置要忽略的目录
 3    - util
 4    - .*~
 5    - api/swagger/docs
 6  skip-files: # 设置不需要检查的go源码文件,支持正则匹配,这里建议包括:_test.go
 7    - ".*\\.my\\.go$"
 8    - _test.go
 9linters-settings:
10  errcheck:
11    check-type-assertions: true # 这里建议设置为true,如果确实不需要检查,可以写成`num, _ := strconv.Atoi(numStr)`
12    check-blank: false
13  gci:
14    # 将以`github.com/marmotedu/iam`开头的包放在第三方包后面
15    local-prefixes: github.com/marmotedu/iam
16  godox:
17    keywords: # 建议设置为BUG、FIXME、OPTIMIZE、HACK
18      - BUG
19      - FIXME
20      - OPTIMIZE
21      - HACK
22  goimports:
23    # 设置哪些包放在第三方包后面,可以设置多个包,逗号隔开
24    local-prefixes: github.com/marmotedu/iam
25  gomoddirectives: # 设置允许在go.mod中replace的包
26    replace-local: true
27    replace-allow-list:
28      - github.com/coreos/etcd
29      - google.golang.org/grpc
30      - github.com/marmotedu/api
31      - github.com/marmotedu/component-base
32      - github.com/marmotedu/marmotedu-sdk-go
33  gomodguard: # 下面是根据需要选择可以使用的包和版本,建议设置
34    allowed:
35      modules:
36        - gorm.io/gorm
37        - gorm.io/driver/mysql
38        - k8s.io/klog
39      domains: # List of allowed module domains
40        - google.golang.org
41        - gopkg.in
42        - golang.org
43        - github.com
44        - go.uber.org
45    blocked:
46      modules:
47        - github.com/pkg/errors:
48            recommendations:
49              - github.com/marmotedu/errors
50            reason: "`github.com/marmotedu/errors` is the log package used by marmotedu projects."
51      versions:
52        - github.com/MakeNowJust/heredoc:
53            version: "> 2.0.9"
54            reason: "use the latest version"
55      local_replace_directives: false
56  lll:
57    line-length: 240 # 这里可以设置为240,240一般是够用的
58  importas: # 设置包的alias,根据需要设置
59    jwt: github.com/appleboy/gin-jwt/v2
60    metav1: github.com/marmotedu/component-base/pkg/meta/v1
61
62linters:
63   disable-all: true
64   enable: # enable下列出 <期望的所有linters>
65      - typecheck
66      - ...
常用命令
1golangci-lint run  #对当前目录及子目录下的所有Go文件进行静态代码检查:
2golangci-lint run dir1 dir2/... dir3/file1.go # 对指定的Go文件或者指定目录下的Go文件进行静态代码检查:
3golangci-lint run -c .golangci.yaml ./...  # 根据指定配置文件,进行静态代码检查:
4
5# 运行指定的linter:  可以传入参数-E/--enable来使某个linter可用,也可以使用-D/--disable参数来使某个linter不可用。
6golangci-lint run --no-config --disable-all -E errcheck ./...
7# 禁止运行指定的liner:
8golangci-lint run --no-config -D godot,errcheck
代码中的特殊设置
忽略某一行所有linter的检查
1var bad_name int //nolint
忽略某一行指定linter的检查,可以指定多个linter,用逗号 , 隔开。
1var bad_name int //nolint:golint,unused
忽略某个代码块的检查。
 1//nolint
 2func allIssuesInThisFunctionAreExcluded() *string {
 3// ...
 4}
 5
 6//nolint:govet
 7var (
 8a int
 9b int
10)
忽略某个文件的指定linter检查。 在package xx 上面一行添加//nolint注释。
1//nolint:unparam
2package pkg
3...
在使用nolint的过程中,有3个地方需要你注意。
首先,如果启用了nolintlint,你就需要在//nolint后面添加nolint的原因// xxxx。
其次,你使用的应该是//nolint而不是// nolint。因为根据Go的规范,需要程序读取的注释//后面不应该有空格。
最后,如果要忽略所有linter,可以用//nolint;如果要忽略某个指定的linter,可以用//nolint:
集成到goland
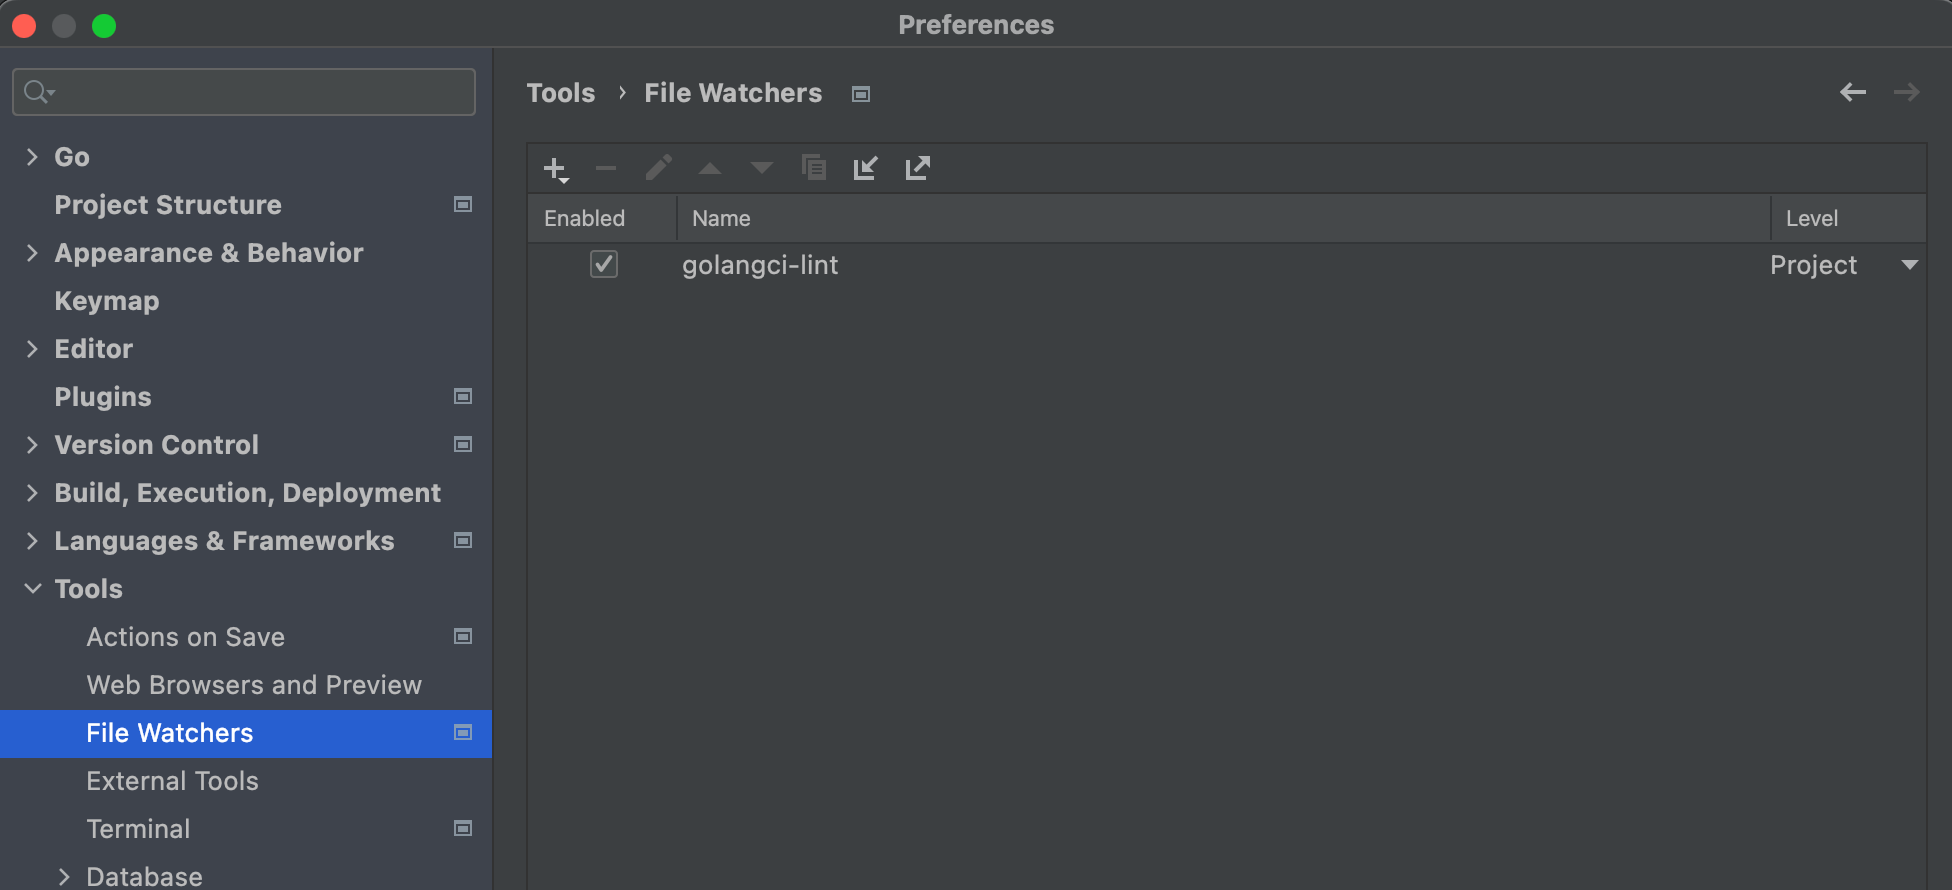
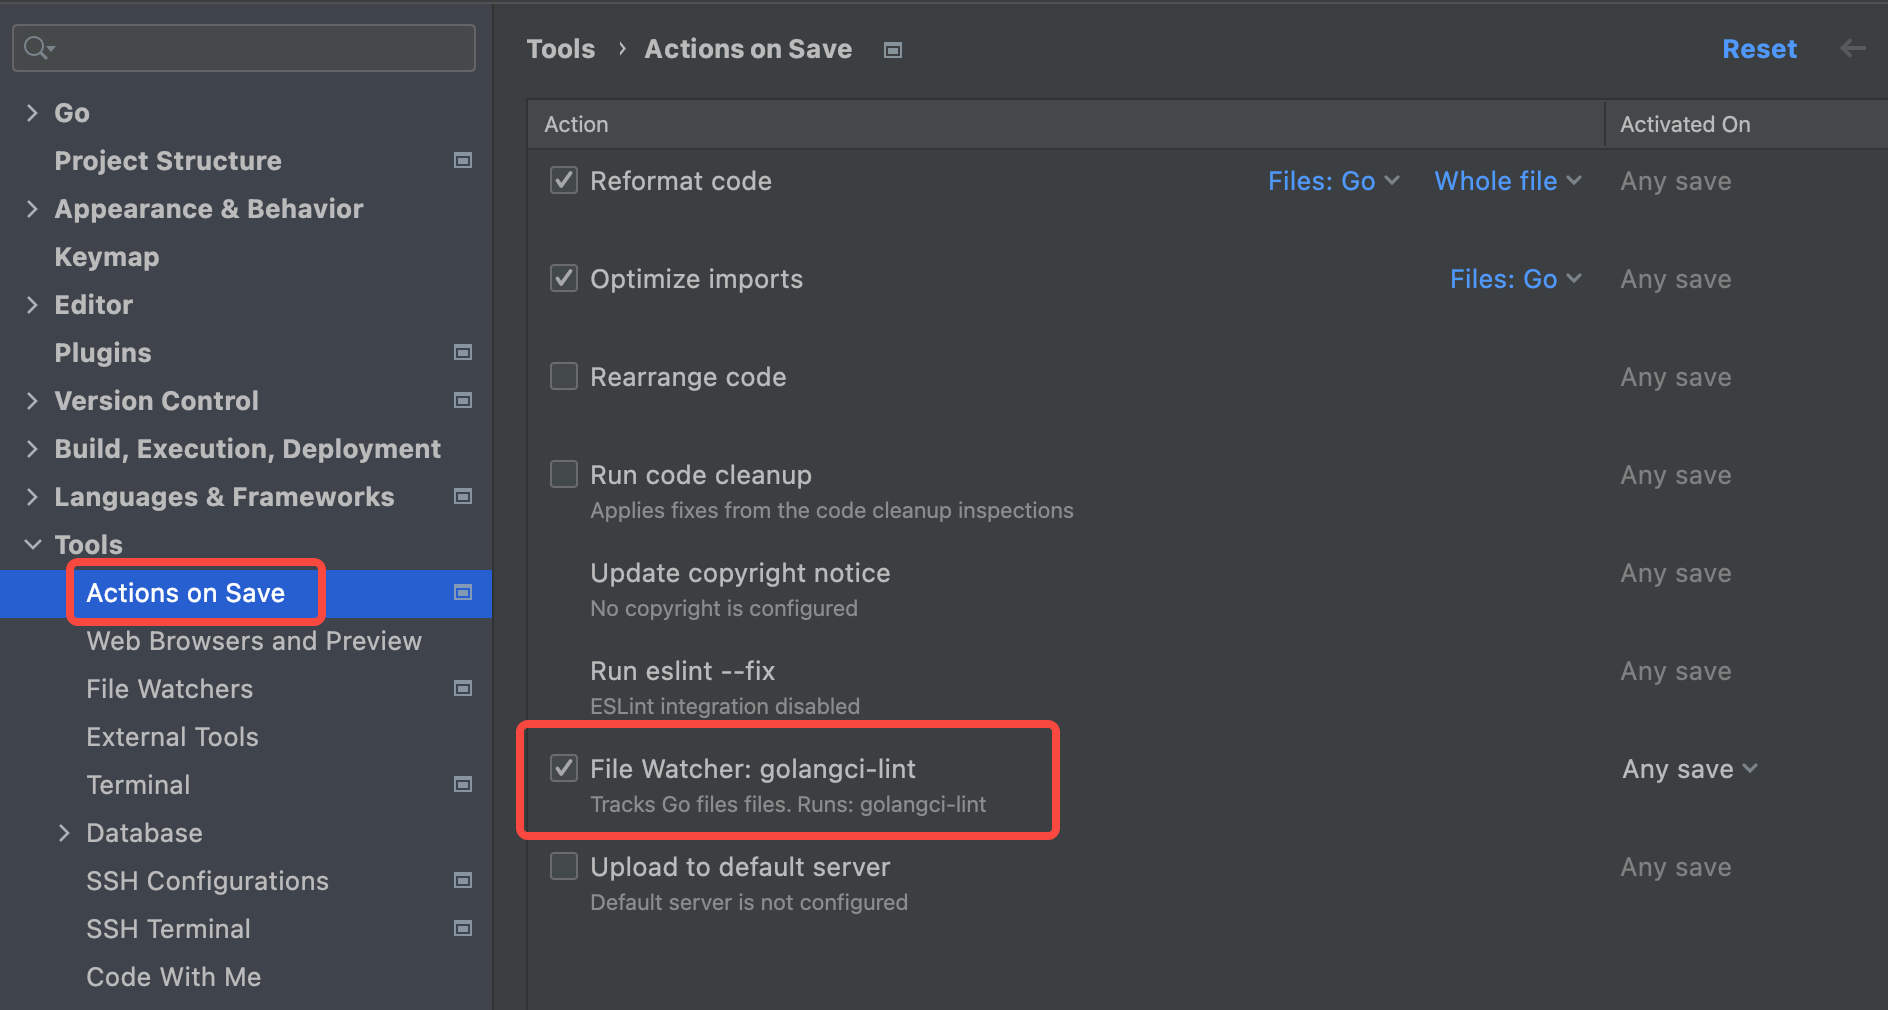
然后ctrl+s 的时候 就会进行检测,(对电脑配置要求挺高的)
18 错误码设计
项目组代号:10
服务代号:01
模块代号:0~99
错误码:0~99
| 错误标识 | 错误码 | HTTP状态码 | 描述 |
|---|---|---|---|
| ErrNo | 10010000 | 200 | OK |
| ErrInternalServer | 10010001 | 500 | Internal server error (服务器内部错误) |
| ErrParams | 10010002 | 400 | Illegal params (请求参数不合法) |
| ErrAuthenticationHeader | 10010003 | 401 | Authentication header Illegal (要登录的接口,头的token认证失败,失败跳登录页面) |
| ErrAuthentication | 10010004 | 401 | Authentication failed (登录失败,输入账户、密码失败) |
| ErrNotFound | 10010005 | 404 | Route not found (请求路由找不到) |
| ErrPermission | 10010006 | 403 | Permission denied (没有权限,一些接口可能没请求权限, 这个估计暂时用不到) |
| ErrTooFast | 10010007 | 429 | Too Many Requests (用户在给定的时间内发送了太多请求) |
| ErrTimeout | 10010008 | 504 | Server response timeout (go服务这边不会返回,一般是nginx、网关超时 才返回504) |
| ErrMysqlServer | 10010101 | 500 | Mysql server error (mysql 服务错误) |
| ErrMysqlSQL | 10010102 | 500 | Illegal SQL (sql 代码错误) |
| ErrRedisServer | 10010201 | 500 | Redis server error (redis 服务错误) |
http code标志错误,非200, 客户端再根据 错误码进行对应的处理
以在自己的框架中实现, 也是参考了这个 。
https://github.com/cr-mao/gosky/blob/main/docs/%E5%A6%82%E4%BD%95%E4%BD%BF%E7%94%A8api.md
https://github.com/cr-mao/gosky/blob/main/infra/errcode/errcode.go
19.如何设计错误包
直接看实现。 已经基本掌握了它的用法, 并变成了自己的包,并丰富了readme文档,和test代码。
https://github.com/cr-mao/errors
微服务该采用Multi-repo 还是 Mono-repo ?
https://cloud.tencent.com/developer/article/2064077
Mono-repo 和 Multi-repo 同样流行,哪一个更好取决于你的项目大小、项目需求以及你需要的版本控制和访问控制级别。
Mono-repo 侧重一致性,而 Multi-repo 侧重于解耦。在 Mono-repo 中,整个团队可以看到某一个人完成的更改,而 multi-repo 为每个团队创建一个单独的 repo,这些团队只能访问所需的仓库。如果你想为你的项目使用 mono-repo 和 multi-repo 的组合,你可以使用 meta,一个管理多个项目和库的工具。