安装java
下载dmg包安装java8
1JAVA_HOME=/Library/Java/JavaVirtualMachines/jdk1.8.0_351.jdk/Contents/Home
2PATH=$JAVA_HOME/bin:$PATH
3CLASSPATH=$JAVA_HOME/lib/tools.jar:$JAVA_HOME/lib/dt.jar:.
4export JAVA_HOME
5export CLASSPATH
classpath作用
在 CLASSPATH 中添加 . (英文句号),让 java 查找当前目录。
1javac  xxx.java
2
3#-d可以把编译出来的class文件放到指定目录 target 下
4mkdir target
5javac -d target xxx.java
6javac -d target -sourcepath src src/xxx.java
7#指定classpath
8java -classpath xxpath  xxx
jar包
windows 中我们使用类似.net可以把需要的类库打包成dll
php中可以打包成phar
java中叫做 jar。两种形式
1)打成可执行的 jar

2)仅仅把我们的业务类库打包,供调用时 引用
生成jar包
1# (xxx.jar是输出文件名, xxx是文件夹名)
2jar -cf xxx.jar xxx
使用jar包
1cd target
2# 也就是说在编译时也要指定classpath 。否则根本连接不到jar文件.
3java -classpath my.jar:. me #linux 是用: 分割多个,windows是;
4
5# target外面执行
6java -classpath target/my.jar:target me
把jar包放到lib里
统一存放。然后编译时方便拼凑 编译脚本
 1rm target/* -fr && echo 'target clear success'
 2for file in ./lib/*
 3do
 4  if [ -f $file ]
 5   then
 6     file_extension=${file##*.}
 7     if [ "$file_extension" == "jar" ]
 8      then
 9       jars=$jars:$file
10     fi
11  fi
12done
13
14javac -sourcepath src -classpath $jars -d target src/me.java
java -cp target:lib/news.jar me
ant构建工具,愉快的编译
下载:https://ant.apache.org/bindownload.cgi
配置环境变量,CLASSPATH
1wget https://dlcdn.apache.org//ant/binaries/apache-ant-1.10.13-bin.zip
2
3vim ~/.bash_profile
4# 加入
5ANT_HOME=~/ant
6PATH=$JAVA_HOME/bin:$ANT_HOME/bin:$PATH
7CLASSPATH=$JAVA_HOME/lib/tools.jar:$JAVA_HOME/lib/dt.jar:$ANT_HOME/lib:.
cd 到项目目录下
创建一个xml文件,叫做build.xml (可以改名字并指定参数,如果不指定默认就是build.xml)
文档地址: http://ant.apache.org/manual/index.html
build.xml depends 是依赖 执行到时候依赖 的target 必须先执行
 1<?xml version="1.0"?>
 2<project name="myjava"   basedir=".">
 3  <property name="src" location="src"/>
 4  <property name="build" location="target"/>
 5
 6 <target name="init" depends="clean">
 7    <mkdir dir="${build}"/>
 8
 9  </target>
10 <target name="compile" depends="init">
11    <javac srcdir="${src}" destdir="${build}" classpath="lib/my.jar" includeantruntime="false"/>
12  </target>
13
14  <target name="clean">
15    <delete dir="${build}"/>
16  </target>
17</project>
1ant compile
多节点classpath配置
location可以指定一个文件路径或文件夹路径。
path可以指定多个用;或:分隔
1 <classpath>
2   <pathelement location="lib/news.jar"/>
3   <pathelement location="lib/my.jar"/>
4 </classpath>
 1<?xml version="1.0"?>
 2<project name="myjava"   basedir=".">
 3  <property name="src" location="src"/>
 4  <property name="build" location="target"/>
 5
 6 <target name="init" depends="clean">
 7    <mkdir dir="${build}"/>
 8
 9  </target>
10 <target name="compile" depends="init">
11    <javac srcdir="${src}" destdir="${build}"  includeantruntime="false">
12        <classpath>
13<!--            <pathelement location="lib/news.jar"/>-->
14            <pathelement location="lib/my.jar"/>
15        </classpath>
16    </javac>
17  </target>
18
19  <target name="clean">
20    <delete dir="${build}"/>
21  </target>
22
23</project>
外部引用
1    <path id="c_path">
2        <fileset dir="${lib}" >
3            <include name="*.jar"/>
4        </fileset>
5    </path>
然后就可以 用
1<classpath refid="c_path"/>  也可以
2
3<classpath>
4    <path refid="c_path" />
5</classpath>
 1<?xml version="1.0"?>
 2<project name="myjava"   basedir=".">
 3  <property name="src" location="src"/>
 4  <property name="build" location="target"/>
 5  <property name="lib" location="lib"/>
 6
 7    <path id="c_path">
 8        <fileset dir="${lib}" >
 9            <include name="*.jar"/>
10        </fileset>
11    </path>
12
13    <target name="init" depends="clean">
14    <mkdir dir="${build}"/>
15
16  </target>
17 <target name="compile" depends="init">
18    <javac srcdir="${src}" destdir="${build}"  includeantruntime="false">
19        <classpath refid="c_path"/>
20    </javac>
21  </target>
22
23  <target name="clean">
24    <delete dir="${build}"/>
25  </target>
26</project>
运行
java -cp target:lib/my.jar me
1<target name="run">
2    <java  classname="me">
3    	<classpath>
4    		<pathelement location="${build}"/>
5		 <path refid="c_path"/>
6    	 </classpath>
7    </java>
8  </target>
1ant run
copy 资源文件
copy 资源文件或者配置文件到 build到目录(target)
1<target name="cp">
2    <copy todir="${build}">
3	 <fileset dir="${res}">
4                <include name="**" />
5           </fileset>
6    </copy>
7</target>
 1<?xml version="1.0"?>
 2<project name="myjava" basedir=".">
 3    <property name="src" location="src"/>
 4    <property name="build" location="target"/>
 5    <property name="lib" location="lib"/>
 6    <property name="resource" location="resource"/>
 7
 8    <path id="c_path">
 9        <fileset dir="${lib}">
10            <include name="my.jar"/>
11        </fileset>
12    </path>
13
14    <target name="init" depends="clean">
15        <mkdir dir="${build}"/>
16
17    </target>
18    <target name="compile" depends="init,cp">
19        <javac srcdir="${src}" destdir="${build}" includeantruntime="false">
20            <classpath refid="c_path"/>
21        </javac>
22    </target>
23
24    <target name="clean">
25        <delete dir="${build}"/>
26    </target>
27
28    <target name="run">
29        <java classname="me">
30            <classpath>
31                <pathelement location="${build}"/>
32                <path refid="c_path"/>
33            </classpath>
34        </java>
35    </target>
36
37    <target name="cp">
38        <copy todir="${build}">
39            <fileset dir="${resource}">
40                <include name="**" />
41            </fileset>
42        </copy>
43    </target>
44</project>
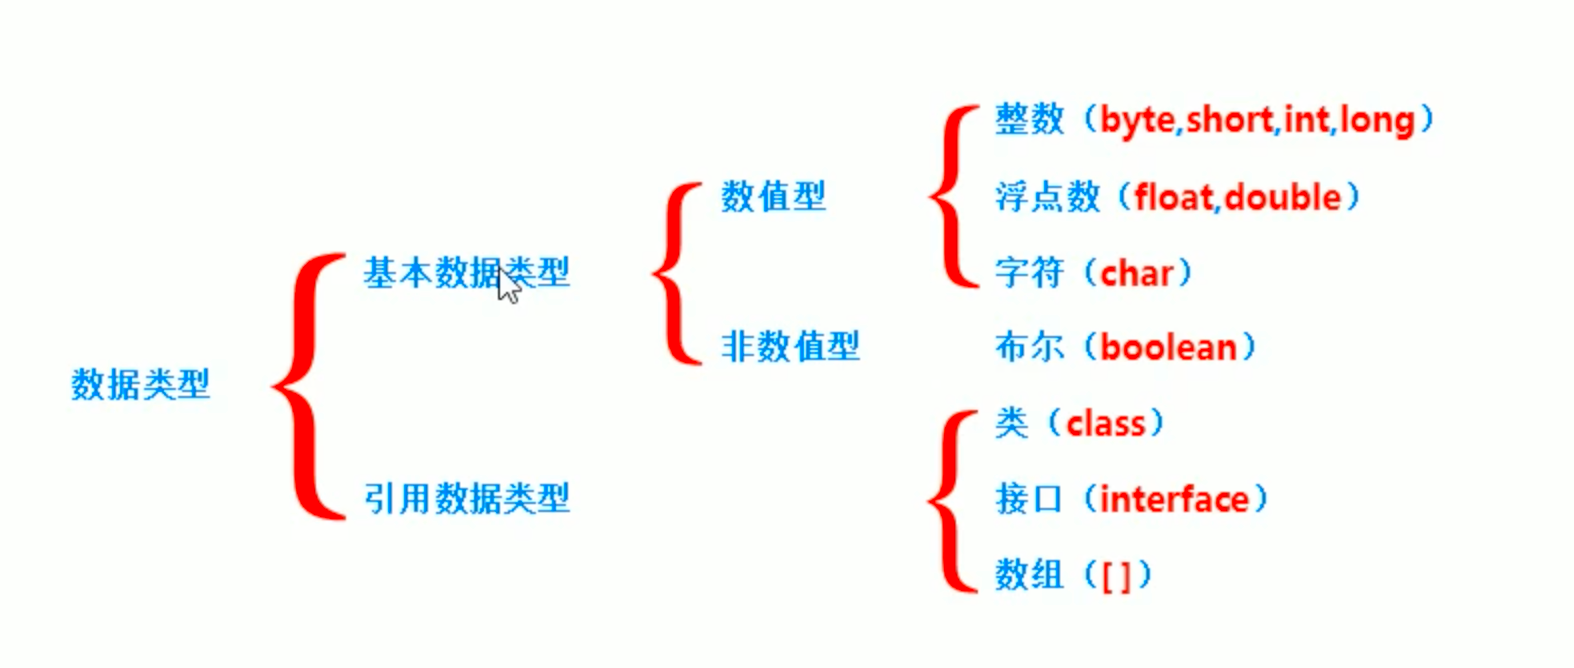
数据类型
