工作中用到的微信开发相关总结, 公众号开发、小程序、微信h5支付。
微信公众号开发前期准备
1.外网服务器或者内网穿透
内网传透:https://natapp.cn
注册帐号,申请隧道,免费的。
下载natapp客户端
1chmod a+x natapp
2./natapp --authtoken={申请的给你的authtoken}
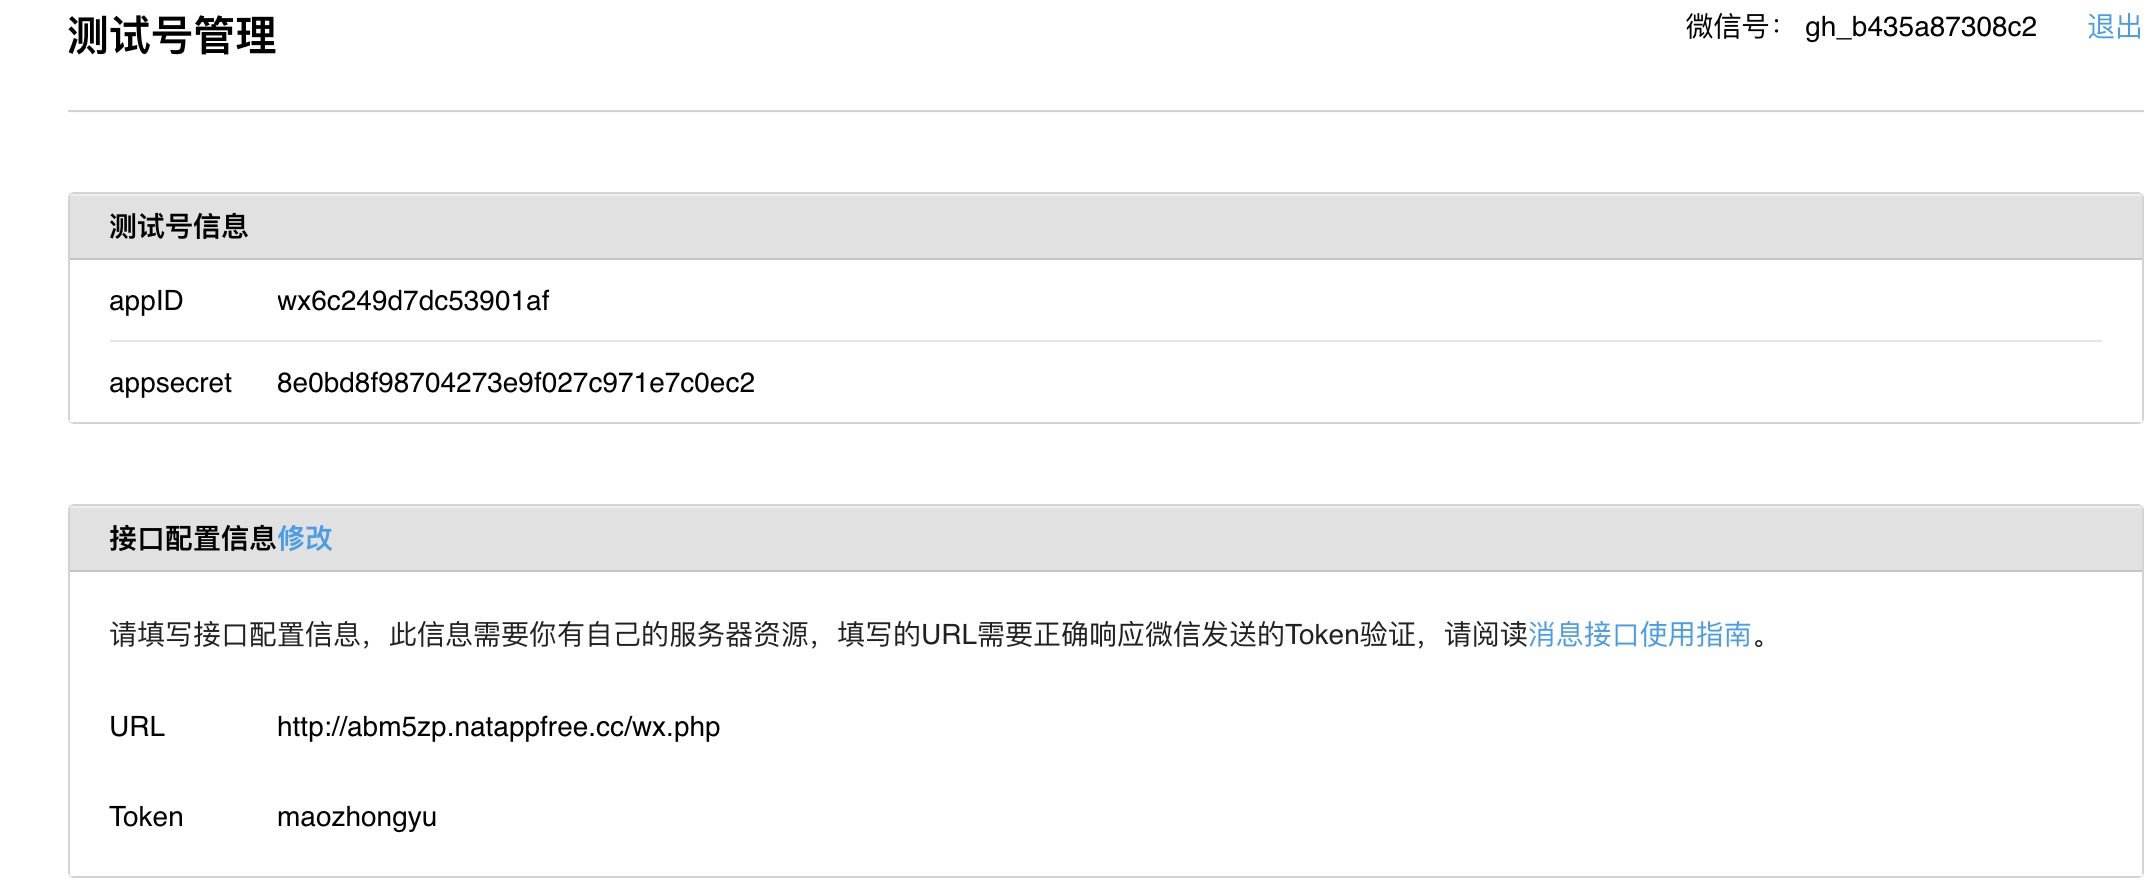
2.申请微信订阅号 (个人) 和 测试帐号
https://mp.weixin.qq.com/wiki 文档
https://mp.weixin.qq.com/wiki?t=resource/res_main&id=mp1421137522 申请测试页面
3.接入微信
https://mp.weixin.qq.com/wiki?t=resource/res_main&id=mp1421135319
 1        $signature = $_GET['signature']; //加密签名
 2        $timestamp = $_GET['timestamp'];//时间戳
 3        $nonce = $_GET['nonce'];//随机数
 4        $echostr = $_GET['echostr'];//随机字符串
 5        //对数组排序
 6        $arr = [$timestamp, $nonce,{TOKEN} ];
 7        sort($arr, SORT_STRING);
 8        $str = sha1(implode($arr));
 9        //该请求是来源于微信
10        if ($signature == $str) {
11            echo $echostr;
12            exit;
13        }
4 被动模式
1	  # 获得微信给我们的xml ,我们根据消息类型输出对应的xml给微信
2     $xml = file_get_contents("php://input");
3    # 把xml转换为object对象来处理
4    $obj = simplexml_load_string($xml, 'SimpleXMLElement', LIBXML_NOCDATA);
5 主动模式
需要全局调用access_token 2小时有效期,最多每天请求2000次,需要缓存
1https请求方式: GET
2https://api.weixin.qq.com/cgi-bin/token?grant_type=client_credential&appid=APPID&secret=APPSECRET
微信授权登录流程
微信授权就使用这个,可以获得用户信息snsapi_userinfo
snsapi_basic ,不能获得用户信息,获得access_token后就结束授权了
1 第一步:用户同意授权,获取code //snsapi_basic静默 用户无感知
2 第二步:通过code换取网页授权access_token //snsapi_basic静默到这一步已结束授权了
3 第三步:刷新access_token(如果需要)
4 第四步:拉取用户信息(需scope为 snsapi_userinfo)
5 附:检验授权凭证(access_token)是否有效
1https://open.weixin.qq.com/connect/oauth2/authorize?appid=wxf0e81c3bee622d60&redirect_uri=http%3A%2F%2Fnba.bluewebgame.com%2Foauth_response.php&response_type=code&scope=snsapi_userinfo&state=STATE#wechat_redirect
1 请求登录地址,获得code
1https://open.weixin.qq.com/connect/oauth2/authorize?appid=wx6c249d7dc53901af&redirect_uri=http://www.blog.com&response_type=code&scope=snsapi_userinfo&state=STATE#wechat_redirect
2
3redirect_uri  注意urlencode下   回调地址
2 根据code 获得access_token
1http://www.blog.com/?code=081RXZ0z0k1Kxg1fvB2z0vY31z0RXZ06&state=STATE
2根据下面地址获得access_token
3https://api.weixin.qq.com/sns/oauth2/access_token?appid=wx6c249d7dc53901af&secret=8e0bd8f98704273e9f027c971e7c0ec2&code=081RXZ0z0k1Kxg1fvB2z0vY31z0RXZ06&state=STATE&grant_type=authorization_code
4{"access_token":"16_CeQXmSLMiMJHoV6qNobayB0IfkyGBunGM4cHg_x7Lwk6ZvH4BviV9gPiKlnVLTAOvaPSpDZ2mdq66zJf3DffOw","expires_in":7200,"refresh_token":"16__bUj4OJDJk2wr9MzShEC0gnrOFS4TeLdQ8qrvQHSLkSURcahxJ1IFUSab9tc5wrzbd7jM5BvYHpnkap4O61B7g","openid":"oXjo1uDuD1Ur8jE-wfXrui_JZ5HU","scope":"snsapi_userinfo"}
3根据access_token, openid 获得用户信息
1https://api.weixin.qq.com/sns/userinfo?access_token=16_CeQXmSLMiMJHoV6qNobayB0IfkyGBunGM4cHg_x7Lwk6ZvH4BviV9gPiKlnVLTAOvaPSpDZ2mdq66zJf3DffOw&openid=oXjo1uDuD1Ur8jE-wfXrui_JZ5HU&lang=zh_CN
2{
3"openid": "oXjo1uDuD1Ur8jE-wfXrui_JZ5HU",
4"nickname": "CR-MAO",
5"sex": 1,
6"language": "zh_CN",
7"city": "瀹佹尝",
8"province": "娴欐睙",
9"country": "涓浗",
10"headimgurl": "http://thirdwx.qlogo.cn/mmopen/vi_32/Q0j4TwGTfTJnqqVBe8KCL3bUVcf07y0S4vPpCJeuoXiapQgEbKsrtwhlDibD59MWiajZibgOYtlricxBrLTzCicVdCPQ/132",
11"privilege": []
12}
小程序登录处理
分2步骤:
/login
/updateWeinxin
-
小程序前端登陆调用后端登陆接口(/login) 根据openid已经存在,则返回服务器token给前端,结束流程.
-
如果上一步请求失效,或用户不存在则进入下一步 调用/updateWeinxin接口 前端 把 wx.getUserInfo 返回的用户加密信息 encrypted_data iv加密算法的初始向量 传给后端, 然后由后端去获得用户信息,用户不存在,则存入自己的库里。 如果用户存在,更新用户信息。最后把设置好的token给前端。
微信公众号支付
- 公众号支付, jsapi授权目录设置
- 认证公众号
- 域名icp 备案
参数准备:
- 商户key
- 商户号
- 终端ip 确认。
Wxconfig,下单
https://developers.weixin.qq.com/doc/offiaccount/OA_Web_Apps/JS-SDK.html#3
1.绑定域名
公众号设置 的 功能设置,js接口安全域名配置, 下载 MP_verify_k5n6VshIKyRwLGPn.txt 放到网站根目录,设置域名 不用带http
1	#可以通过nginx 设置
2      location /MP_verify_xxxxxxxx {
3          return 200 "xxxxxxxxx";
4     }
2.引入js文件
引入js文件 http://res.wx.qq.com/open/js/jweixin-1.6.0.js
3.公众号菜单设置
公众号菜单设置 ,静默授权,跳转获取到open_id
 1  $url = 'https://api.weixin.qq.com/cgi-bin/token?grant_type=client_credential&appid=xxx&secret=xxxx';
 2        $rsp = curl_request($url, [], [], 'GET');
 3        $res=json_decode($rsp,true);
 4        $token=$res['access_token'];
 5
 6        $data = [
 7            "button" => [
 8                [
 9                    "type" => "click",
10                    'name' => '下载',
11                    "key"  => "DOWNLOAD_APP"
12                ],
13                [
14                    'type' => 'view',
15                    'name' => '关于我们',
16                    'url'  => 'https://mp.weixin.qq.com/s/xxxxx',
17                ],
18                [
19                    'name'       => '充值兑换',
20                    'sub_button' => [
21                        [
22                            'type' => 'view',
23                            'name' => '充值兑换',
24                            'url'  => 'https://open.weixin.qq.com/connect/oauth2/authorize?appid=xxxxxxx&redirect_uri=http://xxx.com/recharge&response_type=code&scope=snsapi_base&state=123#wechat_redirect',
25                        ],
26                    ]
27                ]
28            ]
29        ];
30        $json = json_encode($data, JSON_UNESCAPED_UNICODE);
31        $url = "https://api.weixin.qq.com/cgi-bin/menu/create?access_token=" . $token;
32        $result = curl_request($url, $json);
4.wx_config 准备
 1    #Js ticket获得  2小时有效 2000次限制。
 2        ticket = cache.get("public:weixin_jsapi_ticket")
 3        url = app.config.get("H5_FRONT_DOMAIN")
 4        param = {
 5            "noncestr": nonce,
 6            "jsapi_ticket": ticket,
 7            "timestamp": timestamp,
 8            "url": url + "/recharge"
 9        }
10        data = {
11            "list": option,
12            "wx_config": {
13                "appId": appid,
14                "debug": "true",
15                "timestamp": timestamp,
16                "nonceStr": nonce,
17                "signature": generate_wxconfig_sign(param),
18                "jsApiList": ["chooseWXPay"],
19            }
20        }
5.Wx 统一下单 提交前端必须参数返回
 1pay_data = {
 2         "appid": app.config.get("WECHAT_APPID"),
 3         "mch_id": app.config.get("MCH_ID"),  # 商户号
 4         "nonce_str": nonce_str,
 5         "body": "钻石充值",  # 商品描述
 6         "detail": "钻石充值" + product_id,
 7         "out_trade_no": payment_no,  # 商户订单号 wx_recharge 中payment_no
 8         # "total_fee": int(amount * 100),  # 标价金额 提交的金额*100
 9         "total_fee": 1,  # 标价金额 提交的金额*100
10         "spbill_create_ip": app.config.get("SPBILL_CREATE_IP"),  # 终端IP  config中终端IP
11         "notify_url": app.config.get("PAY_NOTIFY_URL"),  # 通知地址,回调地址
12         "trade_type": "JSAPI",  # 交易类型
13         "openid": open_id,
14         "sign_type": "HMAC-SHA256", #  HMAC-SHA256  和 MD5 2种方式和统一下单
15     }
16     sign = self.create_sign(pay_data)
17     pay_data['sign'] = sign
18     xml_data = self.dict_to_xml(pay_data)
19     headers = {'Content-Type': 'application/xml'}
20     url = "https://api.mch.weixin.qq.com/pay/unifiedorder"
21      # 先获得预支付id
22     r = requests.post(url=url, data=xml_data.encode('utf-8'), headers=headers)
23     r.encoding = "utf-8"
24     app.logger.info(r.text)
25     if r.status_code == 200:
26         prepay_id = self.xml_to_dict(r.text).get('prepay_id')
27         nonce_str = str(uuid.uuid4()).replace('-', '')
28         timestamp = str(time.time())[:10]
29         pay_sign_data = {
30             'appId': app.config.get("WECHAT_APPID"),
31             'timeStamp': timestamp,
32             'nonceStr': nonce_str,
33             'package': 'prepay_id={0}'.format(prepay_id),
34             'signType': 'HMAC-SHA256'
35         }
36         pay_sign = self.create_sign(pay_sign_data)
37         pay_sign_data.pop('appId')
38         pay_sign_data['paySign'] = pay_sign
39         return pay_sign_data
40     return False
6.回调
签名比对。金额比对 。 根据我们的订单号 out_trade_no 回调 修改订单状态
通知成功,
告诉微信支付系统,我已经接收到你的请求,并且已经做完处理,不要给我发了
1 echo '<xml><return_code><![CDATA[SUCCESS]]></return_code><return_msg><![CDATA[OK]]></return_msg></xml>';